My Blog List

Monday, October 25, 2010

December Workshop


Hot Pad Table Toppers

December 1
afternoon or evening workshops available.

Sewing machine required.

$20 plus materials.
Bring mat and cutter, ruler and threads to learn to "Quilt as You Go". some kits available $20

November Workshop


Reversible Hand Bags

Nov. 3rd,
Wednesday afternoon or evening.

$10 plus materials

2 Fat Quarters, some elastic, and a couple of buttons or snaps can be made into a reversible handy bag.

Bring a sewing machine, mat and cutter, ruler and thread.

Fat Quarters available in shop, $3.95 each.
fat quarters are quarter metre pieces of fabric measuring 20" x 21"

Learn how at class and then make more for gift items.


Thursday, October 14, 2010

Online Patterns

I completely forgot about this lovely lady, Catherine, who had visited my shop during the summer, but not the purse she had been wearing! When today, in my mail, I received a hand written note from Catherine. Emails are good, but old fashioned letters are even better!
I was pleasantly surprised with the note and included was the pattern for the purse I had admired. Catherine also sent me 2 websites to check out for more patterns for making purses! I looked them over and decided to share:

www.henriettashandbags.com
www.pursepatterns.com (search: hip huggers)

So very kind of you, Catherine!!
Thank you! Thank you!!

Weaving the Tumbling Blocks


Thursday, September 16, 2010

Reversible Runner Class

Offered again this October 2010
The first TWO Wednesday evenings. 6:30 pm - 8:30 pm $30 plus materials

Saturday, September 11, 2010

Squashes

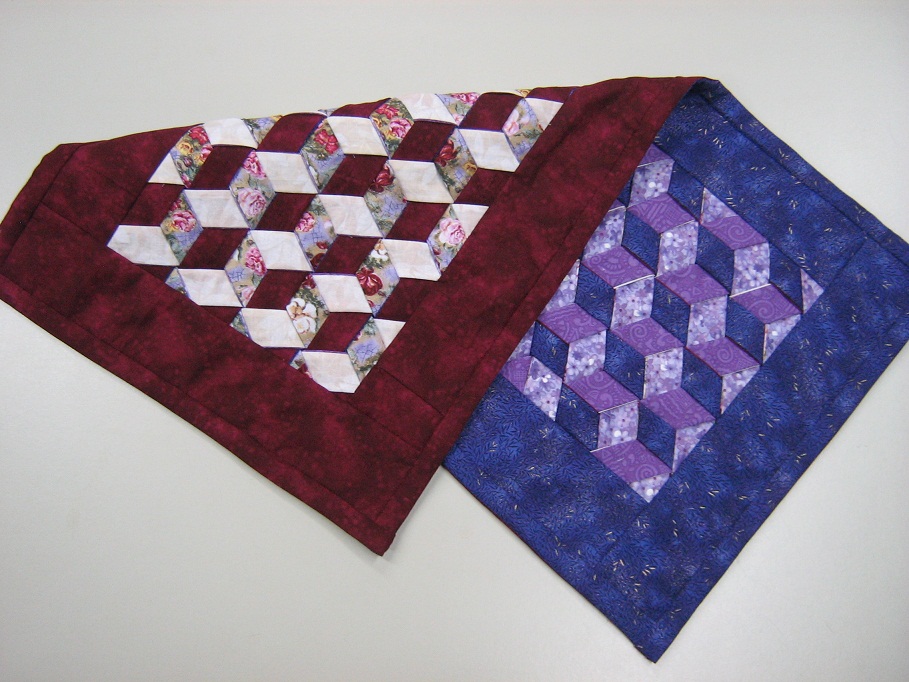
This was my practise block for the fall class that had squashes and pumpkins in it. The stems are 3D. I thought the background was too loud and busy.
It isn't in the class project, so I made a small wall hanging or table topper out of it.
The clips are holding down the edging for me to hand stitch into place.

Friday, September 10, 2010

Scarecrow Wall Hanging


This is it!

The new Fall Class Wall Hanging for 2010.

I still want to add some appliqué, but mostly you can see how it looks.

The apple tree is set on point.

I gave the scare crow some 'hay' out his arms and hat and pant-legs.

The 'cabin' will be foundation pieced.

The crows... Yes they are crows! Not bats! The crows are a puzzle block, to prepare you for the harder Squashes puzzle block.

There is an extra 3D trim around the border.

Monday, September 6, 2010

New Apple Tree

Well, I re-did the apple tree for the Fall Class Wall Hanging. I was not happy with the first one.
What do you think?
I think this apple tree is less colour chaotic with two greens and two reds in the tree instead of a mix of lots of scraps. And I prefer this clean blue background.
Having the challenge of re-designing and getting the whole wall hanging to make sense gives me a thrill.
I can always improve! Seems to be my motto.
Originally I was going to put a bushel basket with appliquéd apples around it on the bottom right under the tree, but I'm re-thinking that area.
How about a log cabin type of house?
Hmmm. I'll need to make a sample, to see if a log cabin house will dimensionally be balanced and complimentary to the overall 'look'.
I couldn't come up with a satisfactory foundation block of flying crows. It just won't work at all. I really want some crows flying over the scarecrow to give motion to the whole look. Probably I'm going to do a 'puzzle block' that will look like crows flying.

Tuesday, August 31, 2010

Quilting & Knitting


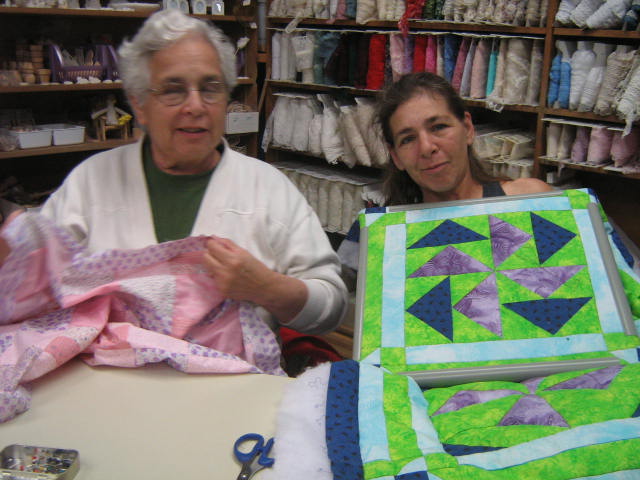
These are some of the knitters, Sara and Toos, showing their completed or nearly completed Mystery Medallion summer projects.
Starting in the centre and adding a new 'round' weekly, measuring and adjusting as they went. It is so cool to see their own personality added to the class assignments, by slightly adding to or changing the stitches, colours or patterns, ON THEIR OWN!
I Love those greens!
Louise led the class through some really great new-to-them techniques. I can't even remember what some of them are called!
I am awed at the range of expertise required, by mostly beginner knitters, to do this lap blanket! You really covered so many unknown problems and solutions doing this one, Louise!
I think the cabled rounds are my favourite!

applause applause


Friday, August 27, 2010

Personal Challenge

This place mat sized topper is made from leftover strips from the Cosmo Quilt we just finished.
I challenged myself to machine quilt it.
I haven't yet.
It could be hand quilted. And I began to do that, but I didn't like the controlled look. I want to give it swirls. And I wanted to challenge myself. I don't really feel comfortable quilting by machine.
Maybe I'll use some variegated thread!

September Class Details

Heritage Hand Quilting Classes
September & October 2010
Mondays or Thursdays
6 - 8 weeks, 6:30 - 8:30pm
$90 plus materials
Scarecrow Wall Hanging

Monday, August 23, 2010

In Progress


I enjoy figuring out new designs, by playing with block sizes, fabrics and colour combinations. Deciding where and what for this Scarecrow was fun! How do you like the embroidery floss standing in for straw?
I want to put some flying crows above this scarecrow, so I'm trying to design with foundation piecing or maybe a couple of puzzle blocks.
I am mostly happy with the apple tree block.
I will do the squashes and apple basket today.

Saturday, August 21, 2010

Fall Project

What do you think?
This is the apple tree I plan to include in our Autumn Wall Hanging.
I'm tempted to re-do it with fewer green colours and maybe a bit more tree filled in.
There will be a Scarecrow and some Squashes!
I'll include Appliqué for vine leaves and maybe a couple of apples by a bushel basket.
I'm not sure about the foundation piecing for the flying crows.... hmm something for me to puzzle out. ;)

Thursday, August 12, 2010

Reversible Table Runner


Under 2 over 1, under 2 over 1...
It's so good to have help when you need six hands to hold everything in place!

Pins and cardboard, lines and more pins!

It took us two nights of Wednesdays to get this far. Then we had Homework.
Mine's done! Wanna see?


Monday, August 9, 2010


Here is Violet. And just as her name, so she colours her quilt; in violets! Jean has honoured my colour choices with her work: Stunning and brilliant!

Darcy's shows her choice of a bold purple for the background (I love it!) and her mom Yvonne, showing her subtle colours that work so well together! Click on the picture to see it larger to see how Yvonne has done a neat addition to her centre flower, adding a few leaves for dimension! Well done, ladies!

Border Class

Every Quilt Enthusiast has said: "I would never have put those colours together, and yet WOW!!" Pinks and oranges, blues and browns. Tones and print design all come into play. Endless possibilities.
A favourite part of the class is seeing the same pattern projects painted with different fabrics, reflecting the individuals' creative flair.
Sometimes a quilt doesn't seem to grow just right, even if it is according to plan. Then a single accent of appliqué or a contrasting thin strip of colour, or maybe the border itself. Any of these can make a quilt grand.
Tonight our class will be doing the bold outside borders and adding posts with appliqué.
The basic pattern of this quilt is simple. Colour is the key.

Thursday, August 5, 2010

Cosmo Quilt Flying Geese

So far we've done the 3D Cosmo flower centre block, 'bricks' and 'yo yo's', strips and posts, and now we are doing the Flying Geese.
This is a Foundation Piecing technique for our project. You do not have to do all Flying Geese as Foundation Piecing, but we like it. With this technique, your points are always sharp and your 'Geese' stay in formation!
In this case, my 'Geese' are various colours with the background a solid white.

Monday, July 19, 2010

We begin at the Centre


The First class in a Medallion Quilt must begin in the centre, as this is how all Medallion quilts begin. Then adding rounds of additional blocks or strips complimenting the overall 'feel' of the finished quilt.
Our first class focused on an appliquéd Cosmo flower which included three-dee flower petals.

Second class added the first round of bricks or blocks including the posts at the corners. (All measurements given in the class)

Embellishing the corner posts included learning how to make Yo yo's. Other embellishments could include buttons or waiting to do the quilting, to use a 'different' corner pattern.

Monday, July 12, 2010

Summer Classes


Cosmo Flower Medallion lap quilt starts with the centre block.
An appliqué not done with fusible webbing.
Later we'll tackle Yo-yo's and prairie points!
We are going to learn some new techniques with marking and quilting as we go.
There is still room in the classes for "I've never sewn anything before!" or experienced quilters looking for some fun with a new project.
The class is 6 to 8 evenings spread over as many weeks. Choose Monday evenings or Thursday evenings.
Don't bring a sewing machine! as this series is all done by hand!

Thursday, May 6, 2010

New Classes Starting!


Valance or Table Runner?
I can't believe it! I actually finished the two projects for samples before the class began!
We will be doing some paper piecing or foundation piecing, plus 3 different blocks. The valance has two extra triangle blocks, one on each end, to balance the valance when over a window or on a mantle as a skirt.
Fabric choices matter in any project, but when you choose to make a valance for a certain room, take into account the room's decor and style.
This project needs one metre of background and three fat quarters for blocks. There is a 'flower' theme of a sort, so consider the flowers you like before choosing fabrics.
I hope to see you at class!

Saturday, May 1, 2010

Finishing Monday's March/April classes


Our classes have always been really super. Friends build brilliant projects into works of art, made with love or just for fun! We are wrapping up this series of Windmills in Spring, taking a week to regroup before we start the next one!
I'll finish the binding on the sample valance for May/June class and post it later this week. It is turning out a lot better than I 'saw' it on paper!
I can't wait to WoW you!
Thank you ladies for sharing!

Wednesday, April 14, 2010

Quilt-as-U-Go Table Topper

This was a fun class. We all picked different fabrics and made huge splashes of colour!
I had done this pattern as a pieced top and quilted in the usual way. (check the gallery in the website) But this class was all done with a sewing machine!
Quilting by definition is three layers of textiles sewn together: a backing, a filler, and the top.
Some fillers(or batting) work better than others depending on the end purpose of the quilted item.
This table topper needed to lay flat and not buckle when things are sat on top of it. So, I opted for a felt filler. Yes! Felt these days is make of polyester, the same stuff poly bats are made of, but uniform and cheaper! It doesn't shrink in the wash and is pretty good at resisting a bit of heat.
We started with the backing face down, laid the filler over it, then started from the centre and 'built' our topper sewing seams through all layers. Some small amount of piecing was required. Binding was added and whip stitched on the back to finish. 2 hours! A done project.
This technique is great for whipping up a gift in a hurry.
Be aware that all sewing is obvious on the back while hidden on the top, so be very neat with your sewing.

Monday, April 12, 2010

Knitters link to Louise!

Knitting Class options can be viewed at wildflowerwoolknits.blogspot.com
Hopefully I have put in all class dates in the calender on the 'classes' page.
I am so thankful for Louise teaching the knitting classes.
Her classes are always fun and challenging. I will eavesdrop on the topic and maybe even try it myself! I'm really looking forward to the summer classes coming up.
Last summer we had a competition between the knitting class and the quilting class. Each doing a six block (knitted or quilted accordingly) throw/quilt. Joining each block after they were finished.
This year we will do a medallion throw/quilt. A totally different technique.
I'm really excited about it.
Keep watching for updates!

Monday, April 5, 2010

Fifth Night


All four blocks should be done now. Yipee!
I'm sure they look great!
See how your colours are coming together!
Each block should be 12" finished (means plus seam allowance)
To prepare for the fifth class:
Sashing & Posts
Choices, choices!
You can opt for the simple plain sashing and posts or the complicated ones like the pictured sample.
Simple sashing is 2"x 12" finished and Simple posts are 2" x 2" finished.
Pictured Sashing & Posts:
There are 3 strips for each sashing between blocks,
Each sashing will consist of 2 outside strips (cut 20) in contrasting colour and 1 inside strip (cut 10) in background colour.
Each strip measures 12" x 1.5" (add seam allowances)
(give yourself a bit extra length in case your blocks are a smidgen over 12")
You can hand sew or machine sew your strips into the 10 three-strip sashings.
The friendship star posts will finish at 4.5" (plus seam allowances)
You will get all directions and templates for the stars in class.
Many of us have made the Friendship star block before in different sizes.

Do not sew your sashing to your blocks until we discuss the order of operations in class. Phew! You had me scared there!
And we'll talk about quilting as a whole project verses piecing two halves, quilting them and then putting them together.


Friday, March 12, 2010

Tips

Lay out fabric pieces according to design.
Always work from your design.
Make triangles into squares, squares into pairs, 2 pairs into a 4 square, 4 squares into 4 square pairs or bars, then bars into full block!
You can do it!
Checking for colour arrangement as you go. Trim seam allowances after sewing seam. Finger press to the dark side.
Any problem, ask me.
I love to see your work!
Those colours are fabulous! Who helped you put those together?

Thursday, March 11, 2010

Lesson One

This quilt measures about a metre square when finished.
The vibrant colours make it a warm and bright quilt.

12" finished block (
finished means not including seam allowance)
broken down into 16 - 3" (finished) squares
most of these squares are further broken down into triangles

Colour placement makes the picture of a large pinwheel or windmill.

Wednesday, March 10, 2010

Spring Classes Now On

Knitting with Louise: Monday evenings or Saturday mornings.

Quilting with Carrie: choose either Monday evenings or Thursday evenings.

+ check calender schedule on website for details and dates.